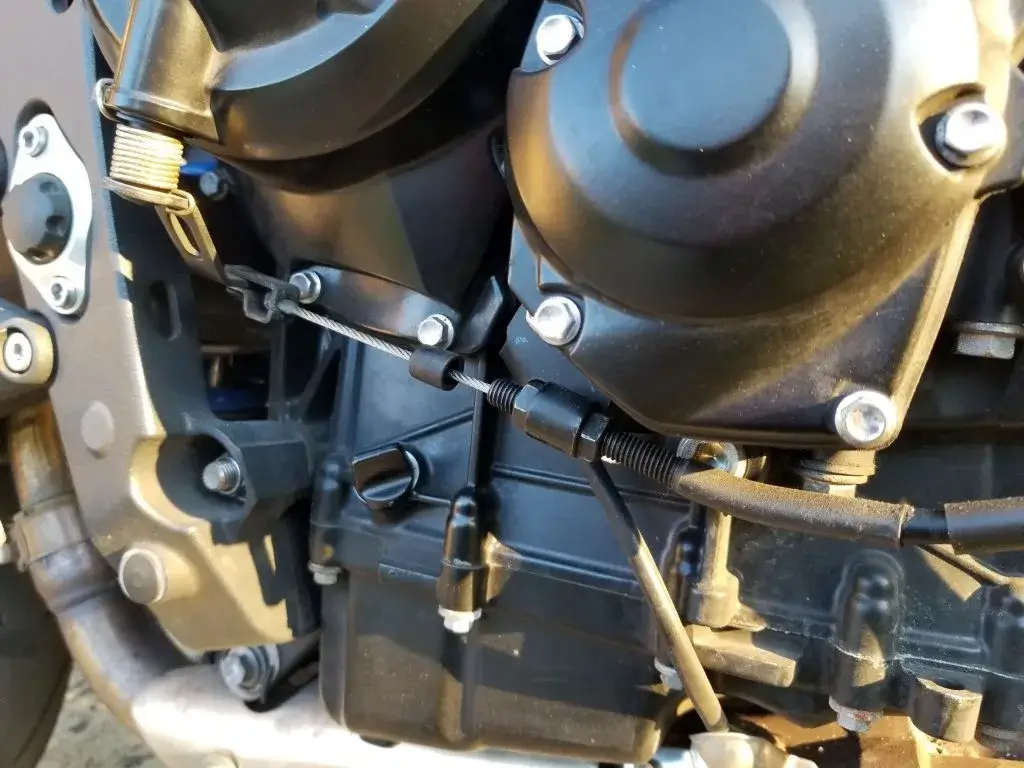
Fuel injection has revolutionized the way motorcycles deliver fuel to their engines. Unlike traditional carburetors, fuel injection systems precisely meter and spray fuel into the engine’s intake manifold. In this comprehensive guide, we’ll explore what fuel injection is, how it works, and the advantages and potential drawbacks of fuel-injected motorcycles.
What Is Fuel Injection?
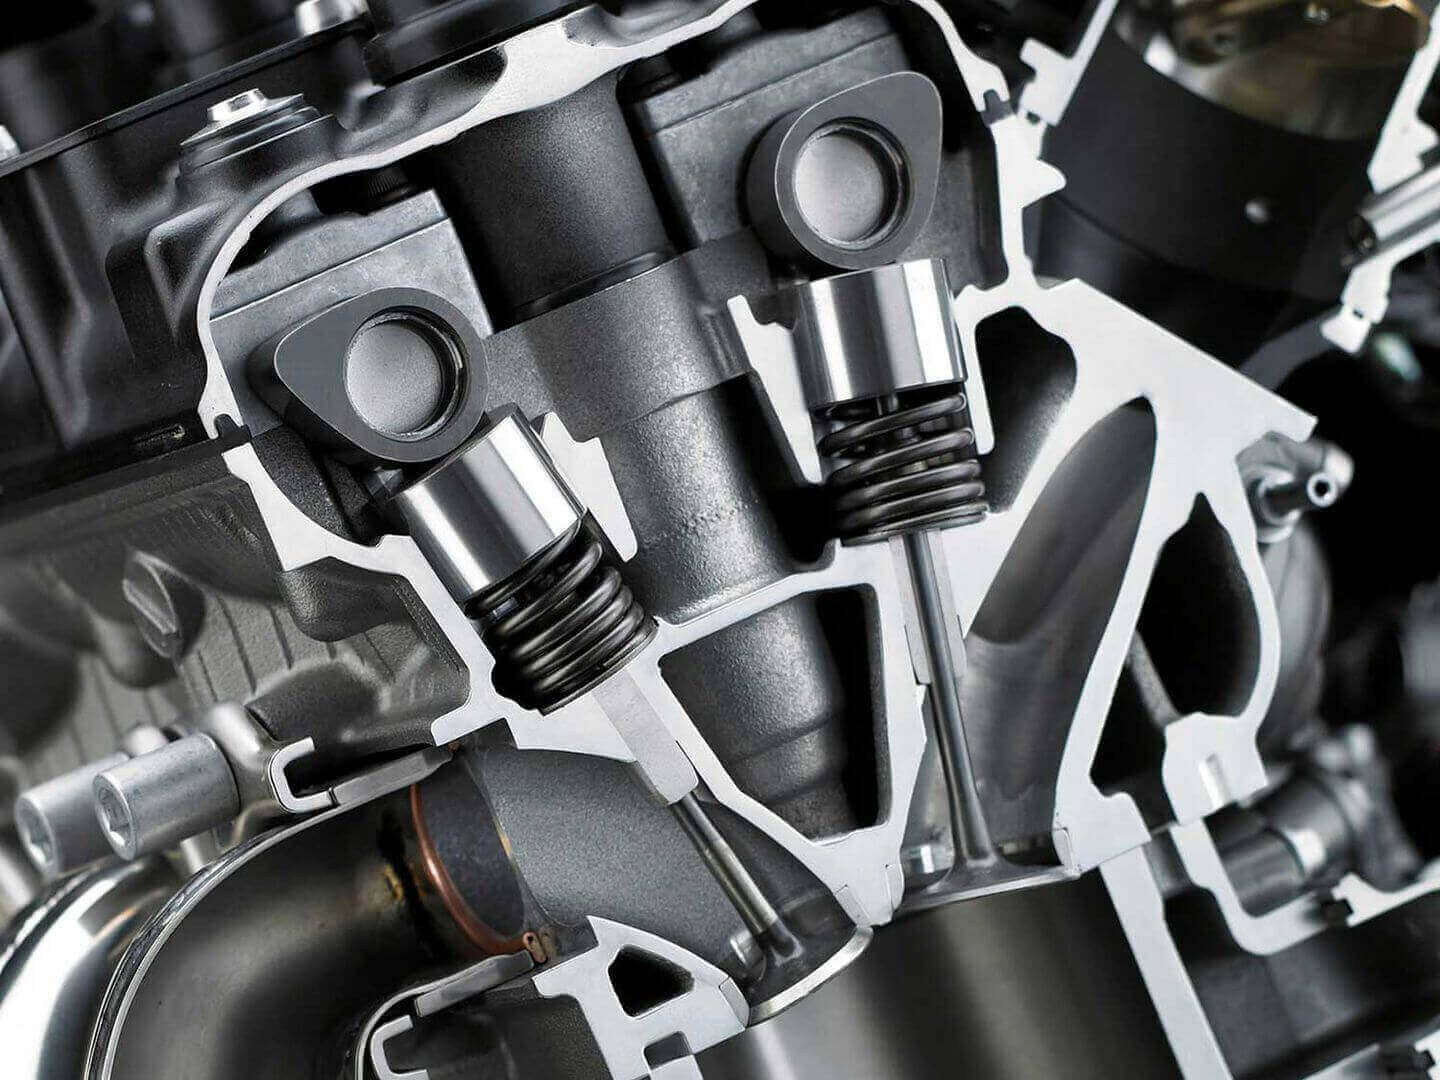
Fuel injection is a sophisticated system used in modern motorcycles to deliver the optimal air-fuel mixture to the engine’s combustion chamber. It replaces the traditional carburetor and relies on electronic controls to precisely regulate the amount of fuel injected into the engine.
How Fuel Injection Works
1. Air Intake:
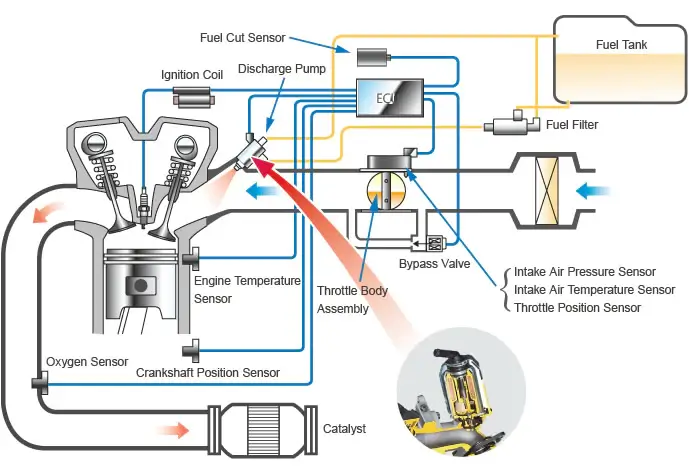
As a rider opens the throttle, the throttle body’s butterfly valve opens, allowing air to enter the engine’s intake manifold. The volume of air depends on the rider’s throttle input.
2. Sensors:
Modern fuel-injected motorcycles are equipped with various sensors to monitor crucial factors. These sensors include the Mass Airflow Sensor (MAF), Manifold Absolute Pressure (MAP) sensor, Engine Coolant Temperature (ECT) sensor, and Oxygen (O2) sensors. They continuously collect data on air volume, pressure, temperature, engine temperature, and exhaust gas composition.
3. Electronic Control Unit (ECU):
The ECU, sometimes called the Engine Control Module (ECM), is the central brain of the fuel injection system. It processes data from the sensors in real-time and calculates the precise amount of fuel required based on the rider’s throttle input, engine load, altitude, and temperature.
4. Fuel Injectors:
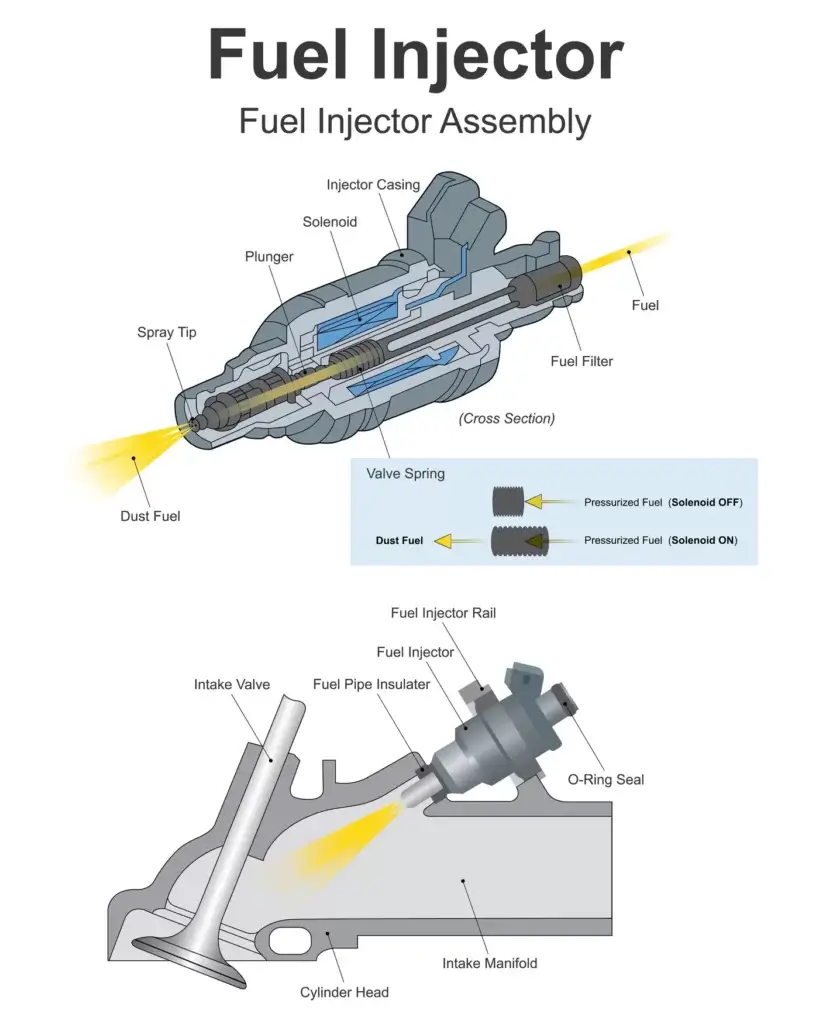
The ECU sends signals to the fuel injectors, specifying how much fuel to spray into the engine’s intake ports. Fuel injectors are typically placed near the intake valves, ensuring that the fuel mixes thoroughly with the incoming air.
5. Timing and Atomization:
The injection timing is precisely controlled to coincide with the intake valve opening, allowing for efficient mixing of air and fuel. Fuel injectors atomize the fuel into fine droplets, enhancing combustion efficiency.
6. Adaptability:
The ECU constantly monitors the engine’s performance through feedback from oxygen sensors placed in the exhaust system. If the mixture is too lean or rich, the ECU can make real-time adjustments to optimize combustion, reduce emissions, and maintain performance.
Advantages of Fuel-Injected Motorcycles
Precision and Efficiency: Fuel injection allows for precise control of the air-fuel mixture, leading to more efficient combustion. This results in better fuel efficiency, reduced emissions, and improved throttle response.
Adaptability: Fuel injection systems can automatically adjust the mixture for changing conditions, such as altitude and temperature. This adaptability ensures consistent performance regardless of where or how you ride.
Cold Starts: Fuel-injected motorcycles typically start more easily in cold weather. The ECU can enrich the mixture during startup, eliminating the need for a choke mechanism.
Reliability: Fuel injection systems are generally more reliable and require less maintenance compared to carburetors, which can be sensitive to clogs and varnish buildup.
Potential Drawbacks of Fuel Injection
Complexity: Fuel injection systems are more complex and rely on electronic components, making them potentially more challenging to diagnose and repair in case of issues.
Initial Cost: Motorcycles with fuel injection tend to have a higher initial purchase price compared to carbureted models.
Limited Availability: While fuel injection is common in modern motorcycles, older or budget-friendly models may still use carburetors.
Maintenance and Tuning
Maintaining and tuning a fuel-injected motorcycle is crucial for optimal performance and efficiency. Here are some key considerations:
Air Filter: Keep the air filter clean to ensure unrestricted airflow into the engine.
Fuel Filter: Replace the fuel filter at recommended intervals to prevent fuel system clogs.
Spark Plugs: Monitor spark plug condition and replace them as needed to maintain proper combustion.
2. Diagnostics:
Diagnostic Tools: Invest in a diagnostic tool compatible with your motorcycle’s ECU. This tool allows you to read error codes and perform in-depth diagnostics.
Software Updates: Stay informed about ECU software updates from the manufacturer, as these updates can improve performance and address known issues.
3. Tuning:
Dyno Tuning: Consider dyno tuning at a professional motorcycle shop. Dyno tuning involves running the motorcycle on a dynamometer to optimize fuel and ignition maps for peak performance.
Fuel Maps: Some motorcycles offer user-adjustable fuel maps. Fine-tune these maps or consult with a professional tuner to optimize performance for your riding style.
4. Throttle Response:
Throttle Sync: Ensure that the throttle bodies are synchronized for consistent throttle response across all cylinders. An imbalance can lead to performance issues.
5. Fuel Quality:
Use Quality Fuel: Always use high-quality fuel to prevent fuel system issues and carbon buildup in the engine.
6. Oxygen Sensors:
Oxygen Sensor Replacement: Oxygen sensors can degrade over time. Replace them according to the manufacturer’s recommendations to maintain accurate feedback for the ECU.
Fuel injection has transformed the world of motorcycles, offering precision, performance, and efficiency. By precisely regulating the air-fuel mixture, fuel-injected motorcycles deliver consistent power, better fuel economy, and reduced emissions. While they may come at a slightly higher initial cost and require more advanced diagnostics when issues arise, their advantages make them the preferred choice for modern riders who seek optimal performance and minimal environmental impact. Whether you ride a sportbike, cruiser, or adventure bike, fuel injection technology enhances the overall riding experience, making motorcycles more powerful, responsive, and environmentally friendly than ever before.
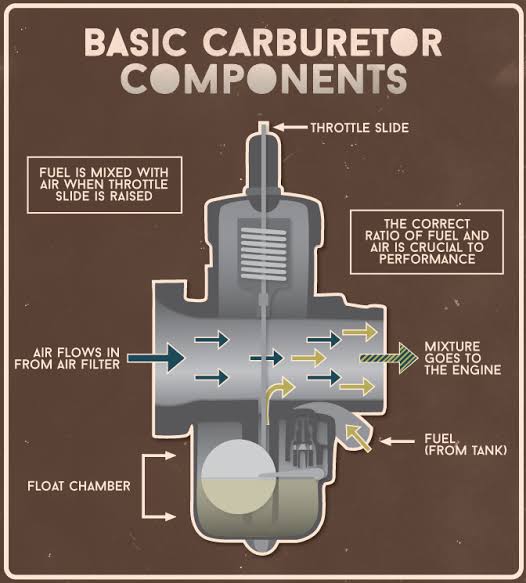
Carburetors have been an integral part of motorcycle engines for many years, providing the necessary air-fuel mixture for combustion. While modern motorcycles often employ fuel injection systems, understanding carburetion remains essential for motorcycle enthusiasts and mechanics alike. In this comprehensive guide, we’ll delve into what carburetors are, how they work, and the advantages and flaws of carbureted motorcycles.
What Is a Carburetor?
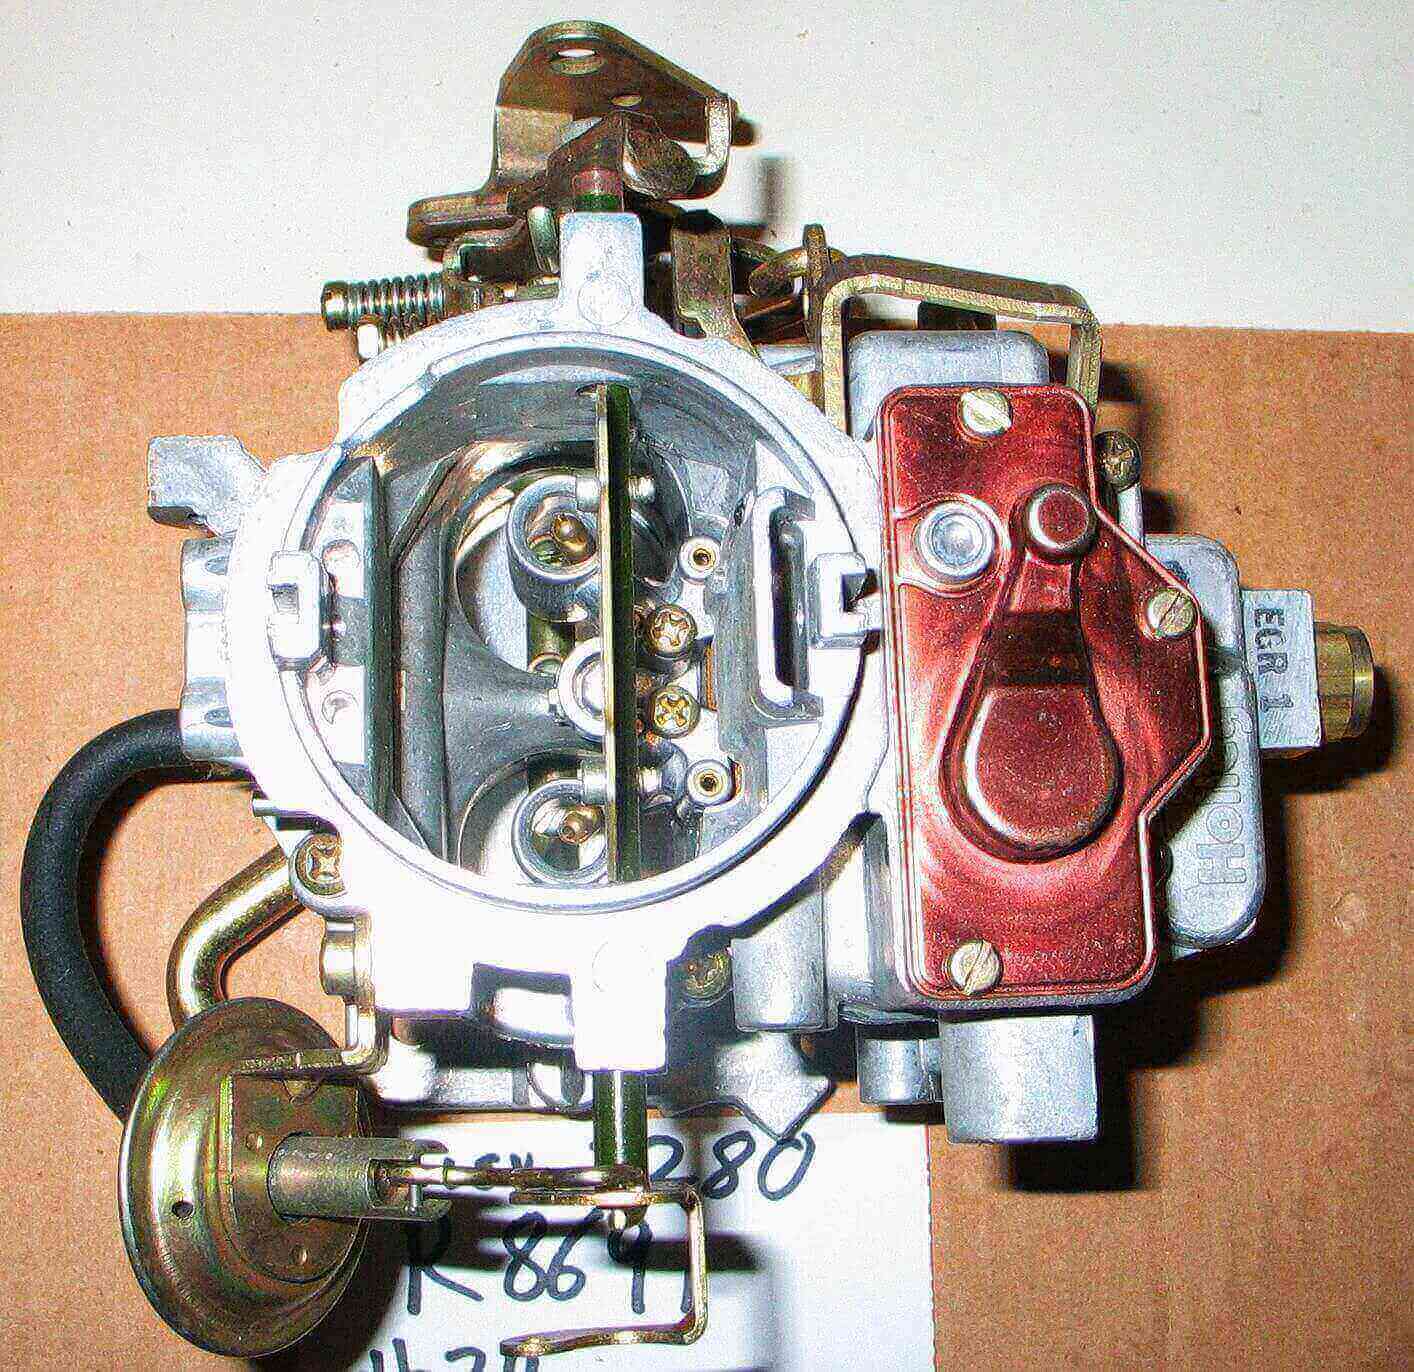
A carburetor is a device that blends air and fuel in the correct proportion before delivering it to the engine for combustion. It plays a crucial role in the internal combustion process, ensuring the engine receives the right air-fuel mixture for efficient and reliable operation.
How Carburetors Work
1. Air Intake:
The process begins when you twist the throttle grip on your motorcycle. As you open the throttle, it increases the size of the carburetor’s throttle valve (also known as the butterfly valve) situated inside the carburetor throat. This action allows more air to flow into the engine.
2. Fuel Delivery:
As air flows through the carburetor, it passes through a narrow section known as the venturi. The venturi effect comes into play here. When air flows through a constriction (the venturi), its speed increases, and its pressure decreases. This drop in pressure creates a vacuum effect.
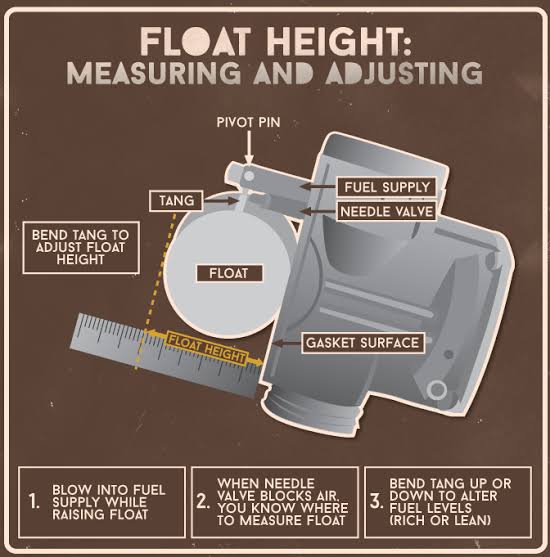
In response to the vacuum, a precisely metered amount of fuel is drawn from the carburetor’s float bowl into the venturi. The fuel is typically stored in the float bowl, which maintains a constant fuel level via a float and needle valve mechanism. This level ensures a consistent supply of fuel.
3. Mixing of Air and Fuel:
The fuel is atomized and mixed with the incoming air as they enter the engine’s intake manifold. This mixture of air and fuel is crucial for combustion. Carburetors are designed to provide a specific air-fuel mixture ratio, often referred to as the stoichiometric ratio, which is approximately 14.7 parts of air to 1 part of fuel by mass for gasoline engines under ideal conditions.
4. Mixture Adjustment:
To achieve the correct air-fuel mixture for different operating conditions, carburetors are equipped with adjustment screws or needles. These adjustments allow you to fine-tune the mixture based on factors like engine speed, load, and temperature. The three primary adjustment screws are:
Idle Mixture Screw: This screw controls the air-fuel mixture at idle and low speeds.
Main Jet: The main jet influences the mixture at higher speeds and throttle openings.
Needle Jet and Needle: These components impact the mixture in the mid-range of the throttle. By adjusting these components, you can optimize the engine’s performance and fuel efficiency.
5. Atomization:
Effective atomization of fuel is a crucial aspect of carburetor operation. The carburetor’s design, including the shape of the venturi and the location of the jets, promotes the breakup of fuel into tiny droplets. Smaller droplets ensure a homogeneous mixture that readily vaporizes in the engine’s combustion chamber. Efficient atomization contributes to better combustion, power output, and fuel economy.
6. Choke:
Carbureted motorcycles often feature a choke mechanism. The choke restricts airflow to create a richer air-fuel mixture, aiding in cold starts. When you engage the choke, it reduces the amount of air entering the carburetor, making the mixture richer until the engine warms up.
7. Throttle Control:
The throttle grip on your motorcycle is directly linked to the throttle valve in the carburetor. By twisting the grip, you control the throttle valve’s position, which regulates the amount of air entering the engine. The more you open the throttle, the more air is allowed in, which in turn draws in more fuel from the carburetor.
Advantages of Carbureted Motorcycles
Simplicity: Carburetors are mechanically simpler than modern fuel injection systems. They have fewer components and are easier to maintain and repair.
Cost-Effective: Carbureted motorcycles are often more affordable, both in terms of initial purchase price and maintenance costs.
Classic Appeal: Many riders appreciate the classic look and feel of carbureted motorcycles, as they often evoke a sense of nostalgia.
Flaws of Carbureted Motorcycles
Fuel Efficiency: Carbureted motorcycles may not be as fuel-efficient as their fuel-injected counterparts. Fuel injection systems can precisely control the air-fuel mixture, optimizing efficiency.
Emissions: Carbureted engines tend to produce higher emissions compared to fuel-injected engines. Meeting stringent emission standards can be challenging for older carbureted motorcycles.
Altitude and Weather Sensitivity: Carbureted motorcycles may require adjustments when riding at different altitudes or in varying weather conditions. Fuel injection systems can adapt more effectively to these changes.
Cold Starts: Cold starting a carbureted motorcycle can be trickier, as achieving the correct air-fuel mixture can take more time and effort in colder weather.
Maintenance and Tuning
To keep your carbureted motorcycle running smoothly, regular maintenance and tuning are essential. Here are some key tips:
Cleanliness: Keep the carburetor and air filter clean to ensure proper airflow and fuel atomization.
Idle Adjustment: Regularly check and adjust the idle speed to maintain a smooth and stable engine idle.
Spark Plug Inspection: Monitor your spark plugs for signs of fouling or wear, as these can indicate carburetor adjustments may be necessary.
Carburetor Synchronization: For multi-cylinder motorcycles, synchronize the carburetors to ensure even fuel distribution and consistent performance.
Fuel Quality: Use high-quality fuel and consider periodic fuel system cleaning to prevent clogs and varnish buildup.
Understanding the intricacies of how carburetors work is essential for any motorcycle enthusiast and mechanic. Carburetion is not only a key component of internal combustion engines but also a fascinating blend of fluid dynamics, precision engineering, and mechanical simplicity. While modern motorcycles often employ fuel injection systems for precise control of the air-fuel mixture, carbureted bikes continue to evoke a sense of nostalgia and maintain a dedicated following in the motorcycle world. Whether you ride a classic carbureted cruiser or a state-of-the-art fuel-injected sportbike, appreciating the mechanics of carburation adds depth to your understanding and enjoyment of motorcycles.
Posted on by Service ManualsComments Off on Checklist for standard motorcycle maintenance: 9 simple steps for peace of mind during the riding seasonPosted in blog
Before you put the kickstand away for the season, go through our maintenance checklist and use it as a guide to give your bike a thorough check.
Table of Contents
It doesn’t take long, and the peace of mind you will have from knowing you inspected your ride from head to toe will more than pay for itself. An hour spent in your garage beats an hour spent on the roadside troubleshooting or waiting for AMA service.
If you follow the motorcycle maintenance schedule in your service manual (the most important tool in your garage) and did your homework before storing your bike for the winter, you will breeze through this list. So roll up your sleeves and start working on all that is needed to make your motorcycle road-ready for the season.
1. Visual inspection
When was the last time you went over every element of your bike? Everything on a vehicle wears down gradually, making even worn-out components impossible to see in regular use. Simply shifting your attitude into “see anything weird” mode might expose flaws that demand care before they become serious, ride-stopping difficulties.
Look for any leaks. Oil and dirt streaks down the fork indicate a failing fork seal. Drips from beneath the bike must be inspected. Is that liquid coolant? Oil? Fuel? Give it a smell, then trace it back to its source. If the leak has been there for some time, you may need to clean up your motorcycle’s nether regions to pinpoint the source.
Look for signs of wear or interference at pivot points and moving components (kickstand pivots, swing-arm, and suspension linkages are usually neglected). Hit any zerk fittings with your grease gun until clean grease comes out the other end of the cavity, and make a note of any bushings or bearings that need to be investigated further or replaced.
Turn on the light. Check your lights and horn, and make sure your registration and insurance are up to date. Is your battery dying or dead? You will need to re-energize the system before checking your signals.
2. Power source
If you have been using a maintenance charger, your battery should be fully charged. If not, connect one immediately. If the battery charges completely, that’s a positive indication, but it doesn’t mean it won’t die halfway through your first big ride of the season.
A multi-meter can provide a good picture of your battery’s overall health (you want to see more than 12.5 V DC at the terminals with the key off) but the choice of champions is a battery tester that can test cranking amps against the number you punch in from the CCA rating stickered on the battery. Aside from testing the terminals for standing voltage, you may do a few more checks with a multi-meter.
Even if you don’t have any fancy meters, you should be able to tell whether your battery is starting to fail by how easily it turns your engine on, and its age. The production date is also printed on the sticker, and if yours is approaching five years old, you should consider replacing it. It’s preferable to replace a battery on your own terms rather than relying on a shop or dealership and perhaps adding the expense of a tow to the repair fee.
To avoid corrosion, clean your terminals and coat them with dielectric grease. This is also an excellent opportunity to open your fuse box and examine your fuses. Check your spares and slip a couple of extras in if there’s space. A blown fuse is one of the most vexing reasons for having to have a bike towed.
3. Wheels and tires
It is impossible to overestimate the significance of tire condition. We only get 2, and the degree of faith necessary to lean into the first bend is enormous. While age must be taken into account, it is not the only — and certainly not the most significant — element in establishing a tire’s road-worthiness.
Motorcycle tires have a longer life expectancy than you may assume, despite the widespread fear of compulsive date-code checks. Tire makers set a “sell by” date of five years, anticipating years of use after that. So, if you buy a new tire and discover it was manufactured a year or two ago, keep in mind that it still has its entire life ahead of it. On a frequently ridden motorcycle, you are unlikely to see a set expire of old age. Still, keep the production date in mind when you inspect the rubber for dry rot, fractures, or excessive hardness from oxidation.
The most respectable death of a motorbike tire is also its most common: wear. If your tire features wear indications, it should be easy to see when the wear bar (placed in a sipe or groove) goes flush with the tire’s surface. If you are unsure, examine the remaining tread depth in the most worn section of the tire (almost always the center). If you require new tires, remember to include replacement valve stems (or inner tubes) and balancing weights (if you plan to mount and balance yourself). Wheel weights sometimes slip off; make sure yours are still in place. You should also inspect your wheel bearings, but first, get your wheels off the ground.
If you don’t already have a raise, jack, or Pit Bull-style front and rear stands, a Bursig lift would be a good option. You can acquire an all-in-one, space-saving gadget that can not only raise your entire motorbike off the garage floor but also dolly it about safely by yourself for roughly the same price as front and rear stands or a hydraulic motorcycle jack.
You are ready to start once you’ve raised at least the front end of your motorcycle. It is possible to identify worn wheel bearings without disassembling the vehicle. To begin, firmly grasp each wheel on either side and shake to check for excessive play (a giveaway that your bearings are toast). If everything seems snug, spin each wheel to test rolling resistance. Do not expect the wheel to spin all day with the brake assembly still in place — pads drag lightly even when not engaged, and the chain, belt, or shaft final drive adds additional drag at the rear wheel — but you should be able to tell by hand whether the wheel rolls smoothly or feels crunchy on its bearings.
4. Final Drive
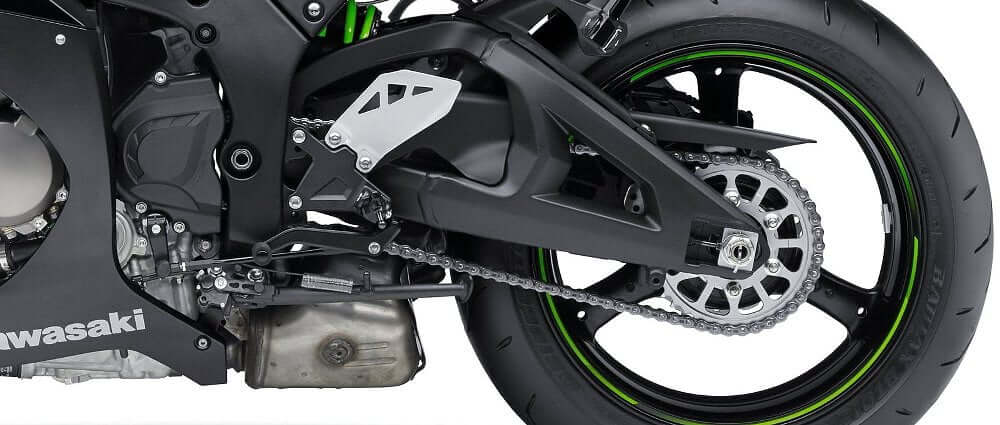
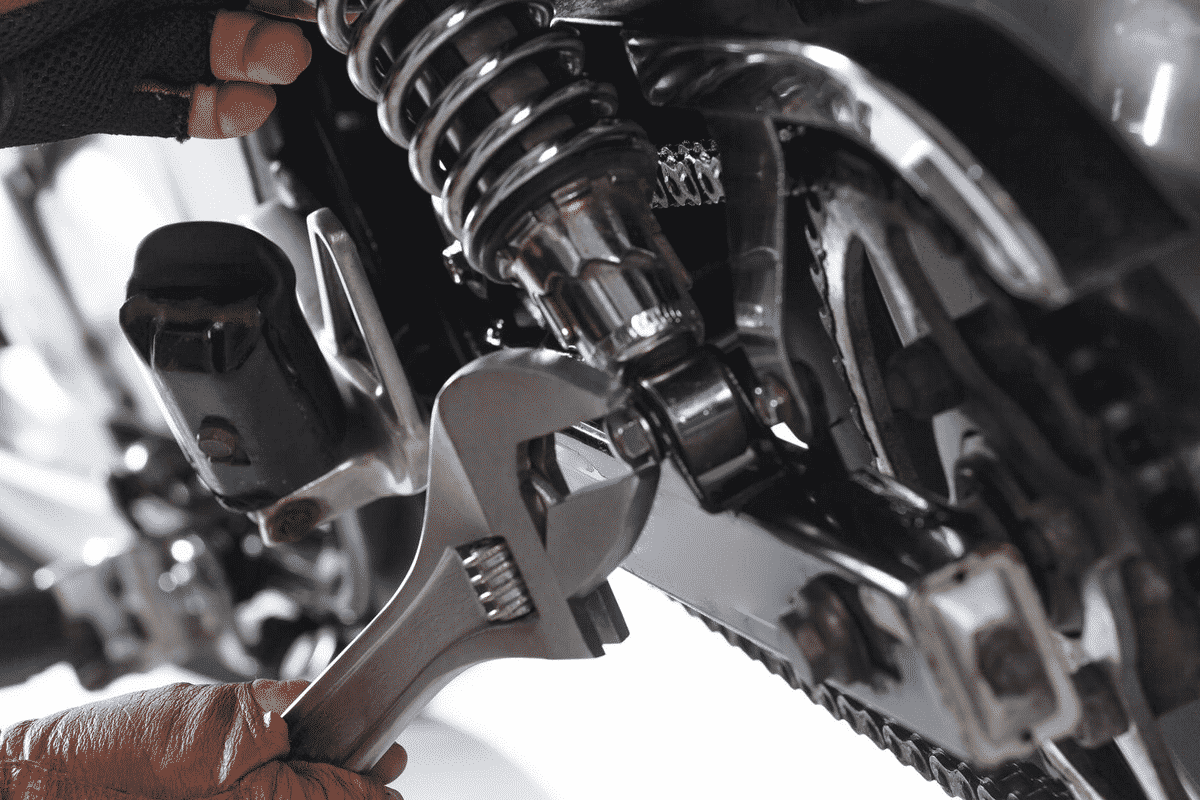
Keep an eye on your drive chain or belt as you move the back wheel. (If you have a shaft and don’t know how old the gear oil is, change it immediately!). First, inspect for any binding, seized links, or excessive chain and sprocket wear that would suggest it’s time to replace the chain and sprocket. If everything appears to be in order, clean your chain with a solvent and brush before lubricating it. Check chain alignment using an alignment tool (do not rely solely on the hatch markings on your axle blocks or swing-arm if you have them) and tension with a gauge. Your handbook will include specifications for tension and wear, which you may use to determine if the chain needs to be changed.
Look for cracks, wear, or stray cords if you have a belt drive. Replace the belt if it seems glossy or if any teeth are chunked out. Drive belts survive a long time, but you should replace them before they’re hanging by a thread. A failing belt will not only leave you stuck but also have a history of breaking under acceleration (think merging onto a highway in front of tractor-trailers).
If your belt passes the visual examination, consult your service manual for specifications before checking belt tension with a gauge. It is well worth the money (and is much more civilized than hanging jogging weights off the belt with wire or zip ties and measuring deflection). After making any required adjustments, rotate the entire shooting match a few times and measure once again.
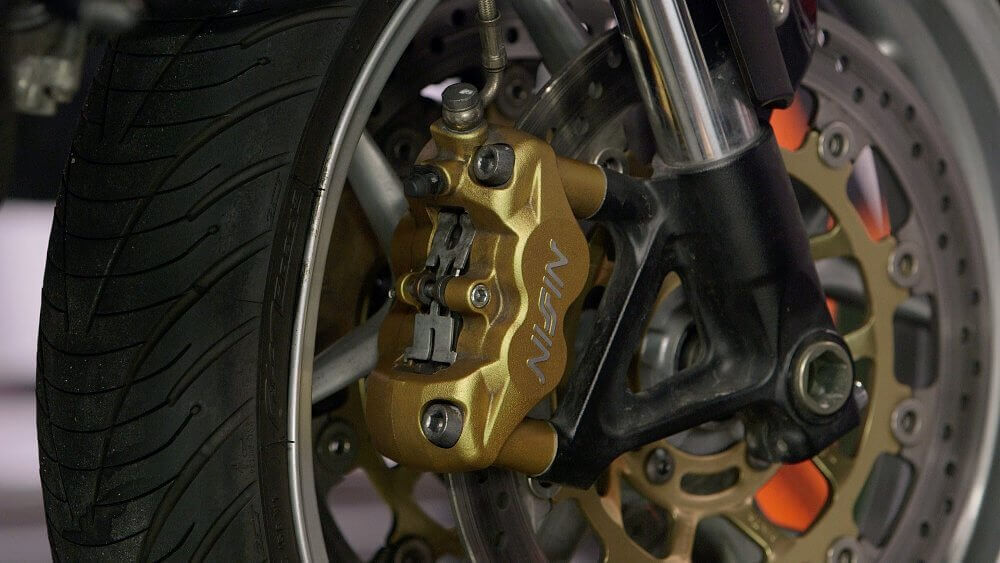
5. Disc brakes
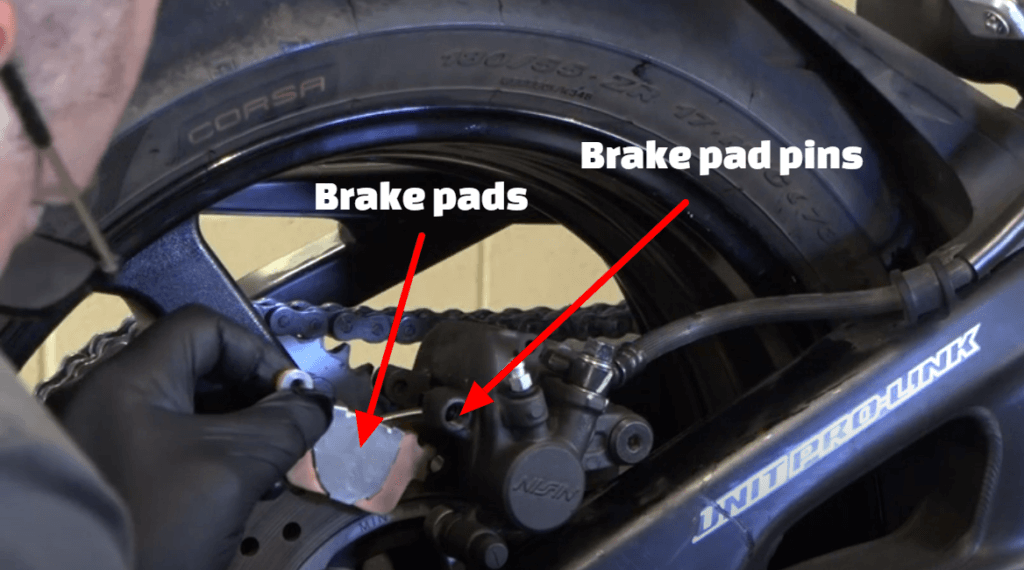
While your bike is still in the air, you can inspect your brake pads with the tires on the ground, but it’s a bit simpler. You may also examine your rotors for warping by turning your wheels. You should also feel the rotor’s surface for any scoring and visually examine it for glazing. Don’t be alarmed if you notice some mild surface rust. If your bike has been resting for a while, this is entirely natural and will go away as soon as you use the brakes, but I prefer to clean them with brake cleaner to make me feel better.
Next, take note of how much meat remains on the pads and check if they are wearing evenly.
To ensure that they are still safe to run, compare the remaining depth of the pad material to the specification in your service manual. Trying to use up every last bit of a brake pad is a short-sighted tactic since you risk damaging your rotors or failing to stop if you wear down to the backing plate.
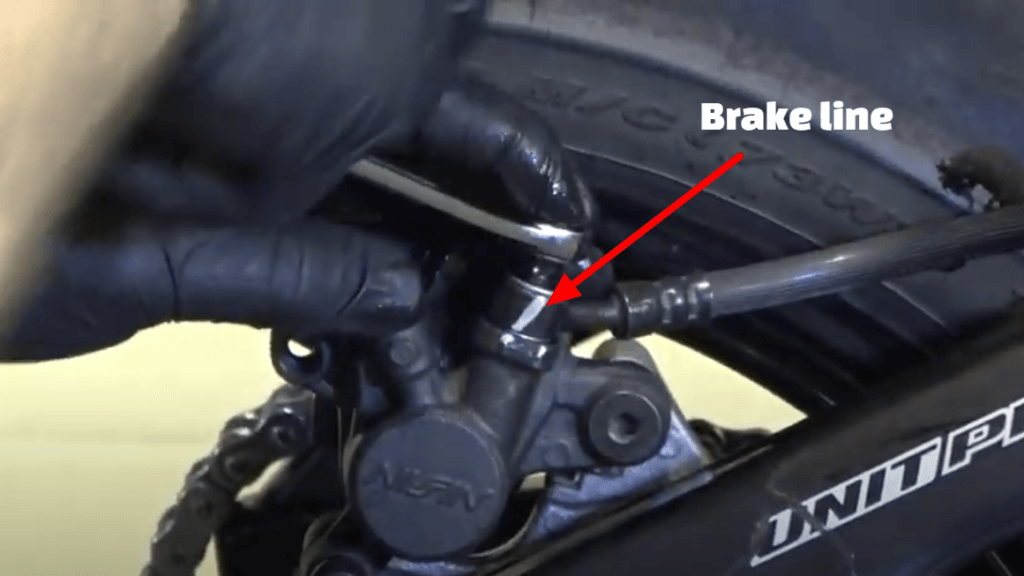
Examine your brake lines for evidence of wear or age as well. Rubber brake lines do not survive very long, so even if your bike is just five or ten years old, it may be time to retire them. New stainless steel lines will significantly enhance brake feel and control. Lines are more usually overlooked than brake fluid. Check your service manual for a replacement interval. However, for those that ride hard (track days?) or follow aggressive maintenance plans, change it every other season or if the fluid becomes hot.
6. Fluids
Brake fluid isn’t the only frequently neglected fluid for refreshing. What is the age of your coolant? Although your machine’s maintenance periods may vary, the fresh coolant should be added every other season (check the manual). Thorough water cleanses, or even a simple drain and fill, will go a long way toward avoiding corrosion within your cooling system. (Installing a new radiator cap at the same time is an inexpensive insurance policy.)
I’m looking at new motor oil and filter, main fluid, and trans fluid before my first trip of the year. Even if you are not quite at your mileage interval, it never hurts to start early so you are ready for the season. When it comes to time, you should consider the age of the oil as well as the mileage. If you have several motorcycles or just don’t put a lot of miles on your machine, changing the oil at least once a season ensures that it has been done and that you don’t have old, tainted oil in your cases. Lower mileage frequently correlates to a lot of short rides, which implies a lot of heat cycling to attract moisture condensation, which is what truly tears down oil. Consider your style of riding when selecting whether to replace your oil.
7. Filters
Always use a fresh oil filter, and keep track of fuel and air filter recharge or replacement. My bike requires air filter service every 5,000 miles and a fuel filter every 25,000 miles. Check your workshop manual or a parts diagram; there might be another gasoline screen in the petcock or fuel pump pickup that has to be replaced. Check if your exhaust has fiberglass packing (cotton candy pouring out of your exhaust tip is a dead giveaway if your packing is burnt). This is not an off-road occurrence, albeit dirt bike intervals are often significantly shorter (a matter of hours, not miles, especially for two-strokes, where oil is a factor on top of heat). When you recharge or replace the air filter, repack the muffler. What goes in must necessarily come out, right?
8. Controls
Check and adjust your clutch and throttle for smooth operation. With cable lube and this handy tool, ease your clutch and throttle cables, then adjust your push and pull cables until the throttle begins to open and returns to idle position on its own. If your strong clutch pull or sticky throttle cannot be lubricated or adjusted, search for interference on the lever or throttle tube itself, as well as binding caused by incorrect cable routing. Replace the cables if they are worn.
Sit on the bike and check if your mirrors have come free. Check for cable and electrical interference or strain, as well as notchiness in the steering head bearings, by turning the handlebar lock to lock. Check that your shifter and brake pedal are indexed correctly. You may have become accustomed to a less-than-ideal position last season; modify now before you develop that muscle memory again. Regardless of whether you alter anything, be sure the brake and shifter are tight (thread locker is my old friend). Consider yourself fortunate if you have never had a shift lever come free and destroy the spline shaft (it is a very invasive, labor-intensive job that costs a lot).
9. Last check
Torque all of your key fasteners, including handlebar and triple clamps, axle bolts and adjusters, and motor mounts. Check your oil and coolant levels again. Check that you tightened anything back down that you disturbed during your examination. Take out a tire gauge and check the pressure. If you charged your battery while inspecting the rest of the bike, try your lights and horn immediately. Finally, start it up and you are set for a test drive to the gas station for some new gasoline! Remember to let your engine warm up before accelerating, and that your tires may still be cold and sticky.
That’s all there is to it. Now you can sit back and enjoy the ride!
Posted on by Service ManualsComments Off on FREE Owner’s Manual for your MotorcyclePosted in blog
A free owner’s manual (also known as an instruction manual, user’s handbook, rider’s manual or owner’s handbook) is a book or booklet that comes with practically all technologically advanced consumer items such as motorcycles, motorbikes, scooters, and two-wheelers. The following information is normally included in the owner’s manual:
For liability considerations, safety instructions can be comprehensive, typically containing cautions against performing activities that are ill-advised for device longevity or general user safety.
Normal or planned operations are described in these instructions.
Instructions for maintenance.
Troubleshooting instructions are provided in the event that the bike does not function as planned.
Service centers; for when the product has to be repaired by a factory-authorized technician.
Information about regulatory code compliance, such as safety or hazards.
Technical standards for motorcycles.
Warranty information; occasionally supplied on a separate sheet.
Until the last decade or two of the twentieth century, it was common for an owner’s manual to include detailed repair information, such as a circuit diagram; however, as products became more complex, this information was gradually relegated to specialized service manuals, or omitted entirely, as devices became too cheap to repair economically.
Many brands provide PDF files of manuals that may be read or downloaded for free from their websites. Here are the list of the brand we cover on this site, with direct links to their downloadable free owner’s manuals.
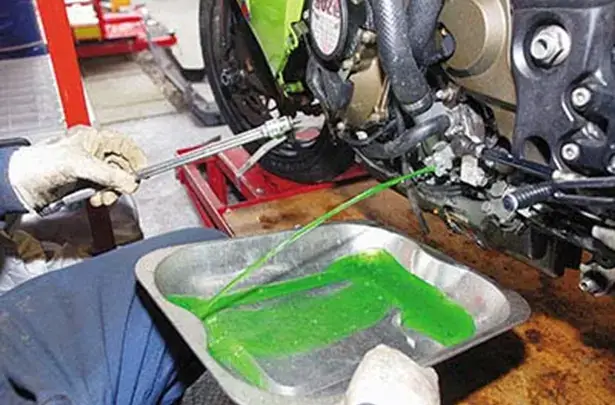
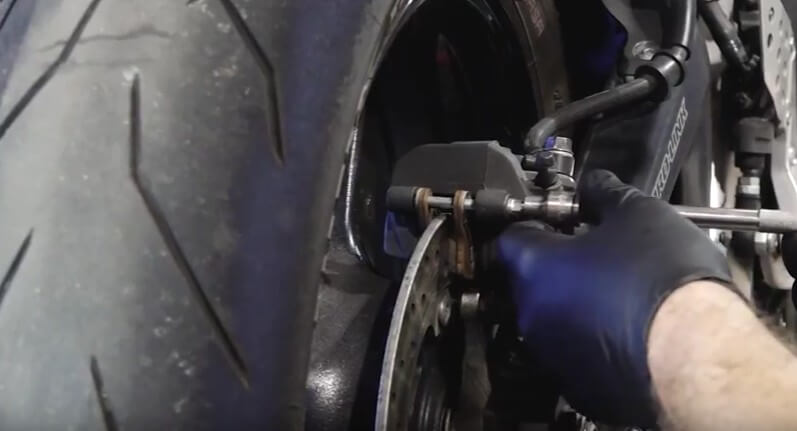
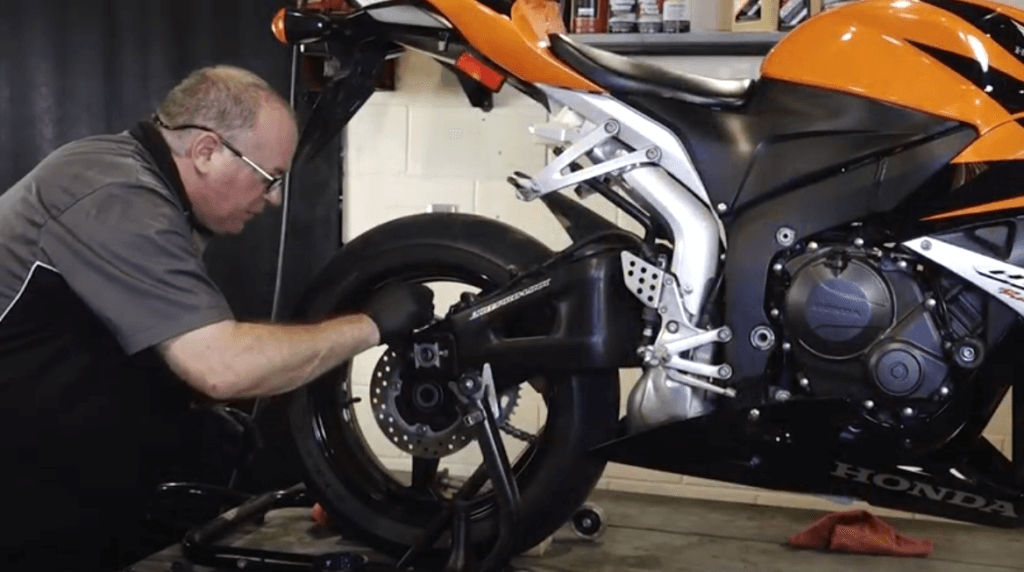
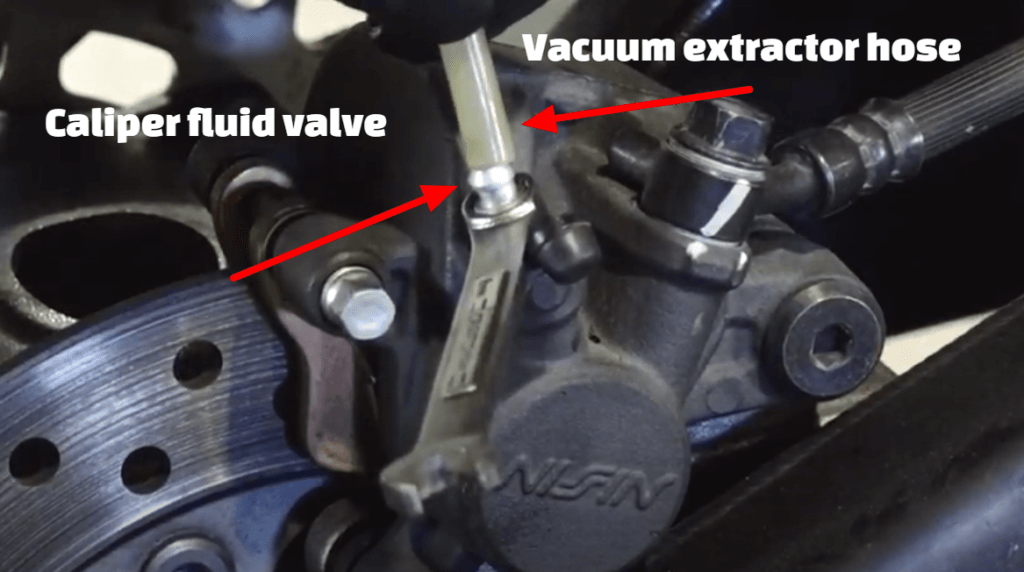
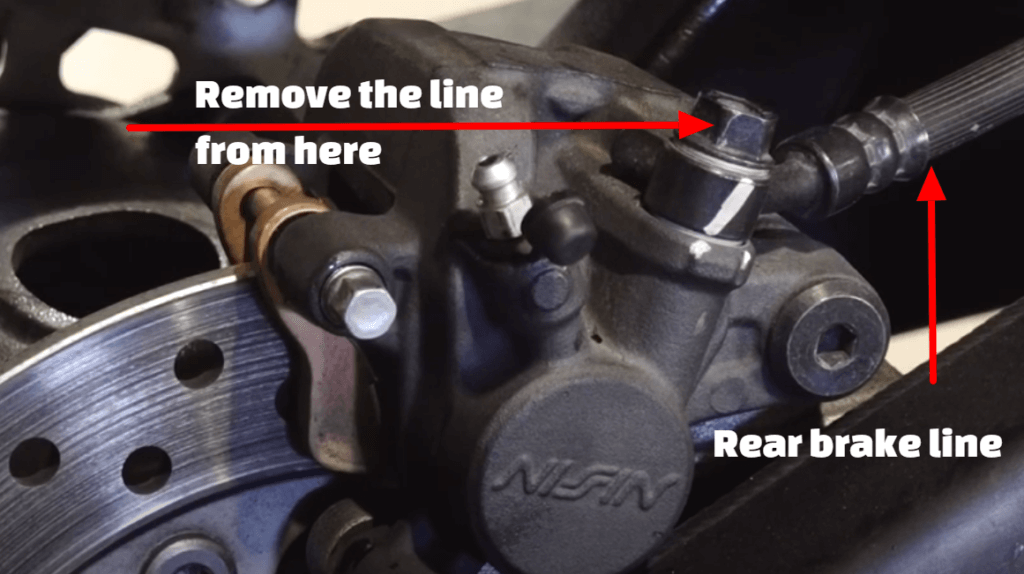
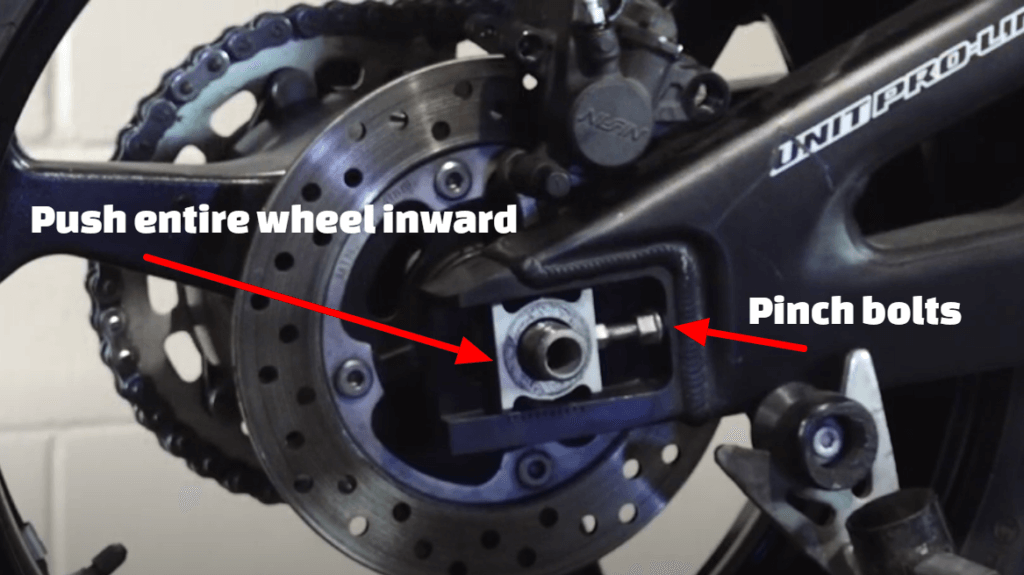
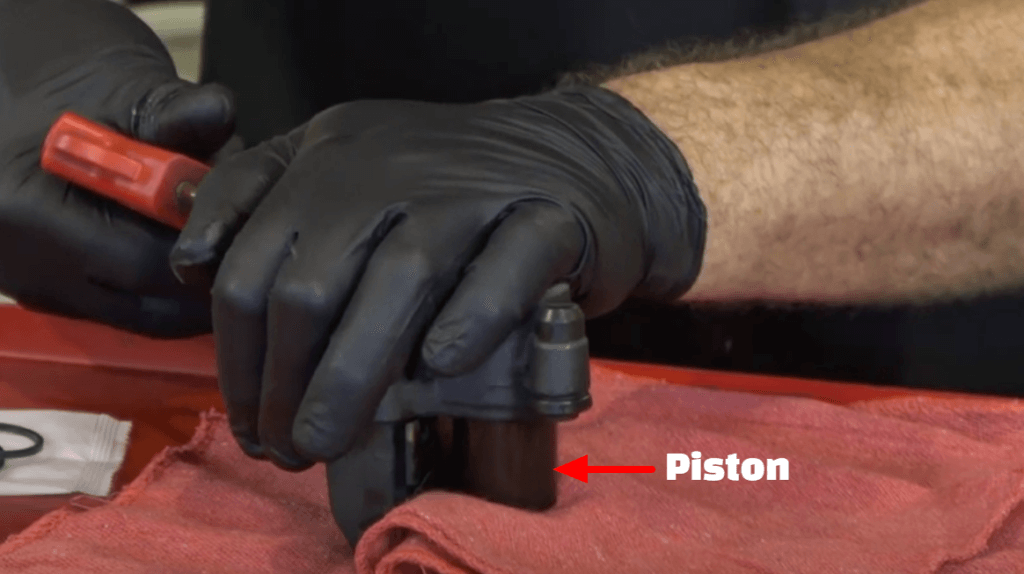
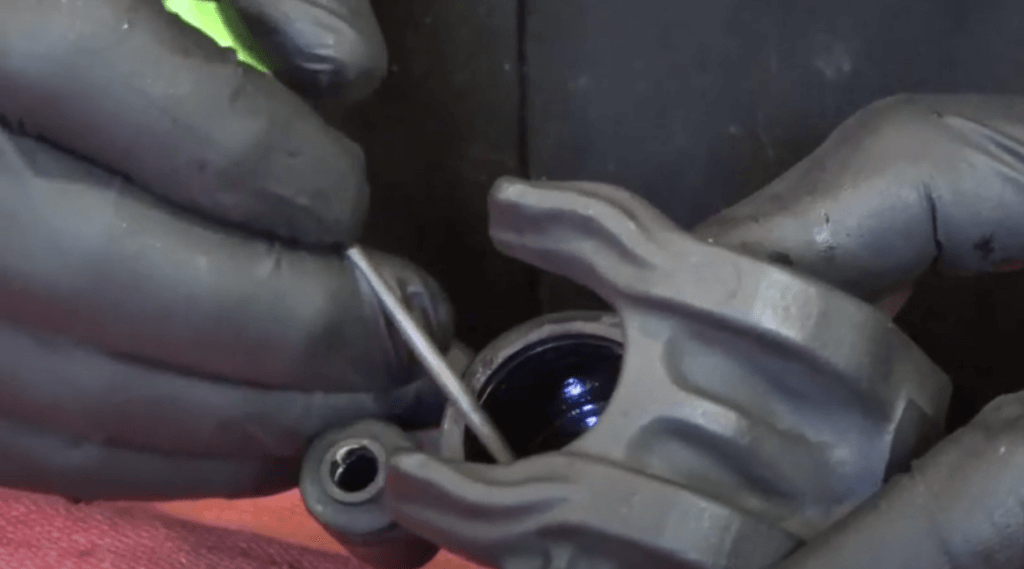
The process involves extracting the brake fluid out of the system, removing the caliper, cleaning the piston, rebuilding the caliper and refilling the reservoir. Follow the steps below to rebuild the rear brake caliper for a Honda CBR600 motorcycle.
Tools and Parts Needed – Honda CBR 600 Rear Caliper Rebuild
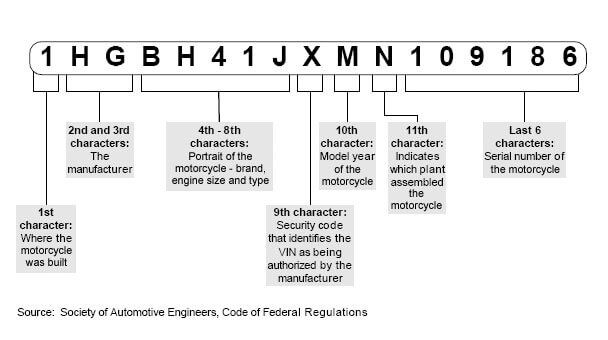
Your motorcycle’s Vehicle Identification Number, or VIN, is a 17-character identification that belongs to the vehicle’s history. The VIN contains data about the manufacturer, model year, and production location. The VIN is your motorbike’s identifying number in many ways.
Vehicle identification numbers (VINs) can be found on vehicle registrations, titles, and even insurance cards. When purchasing parts, using the VIN is a sure way to acquire exactly what you need, and a sales agent will commonly ask for it.
Furthermore, whether you’re selling or buying a used motorcycle, the VIN tells you or a potential buyer whether the bike has been in an accident, rebuilt, or even stolen, among other things.
The VIN seems to be one long string of letters and numbers, but it is really divided into three sections: the first three characters, the next six (spots four through nine), and the last eight.
The first three letters comprise the World Manufacturer Identifier. The first character represents the country code. The USA is represented by the letter “1” or “4”, Canada by the letter “2,” England by the letter “S,” and Germany by the letter “W.” The manufacturer is represented by the second digit. Kawasaki, for example, gets the letter “K,” Honda gets the letter “H,” and Suzuki gets the letter “S.” The vehicle is identified by the third character. Motorcycles are often designated with a “1” or a “A.”
The Vehicle Description Section is made up of the six characters listed below, and it describes the manufacturer’s vehicle features. Characters four through nine vary depending on the manufacturer, but they always include engine size, engine type, and even model information. The ninth digit serves as an accuracy check, ensuring that the preceding characters were approved by the manufacturer. The tenth digit represents a year code, while the eleventh digit represents a factory code.
The last eight characters of the Vehicle Identifier Section indicate the year and location of manufacture, as well as the serial number.
The digits 0 through 9 and letters A to Z are used, with the exception of I, O, and Q, which are used to avoid confusion with the numerals 1 and 0. There are no additional characters used than letters and numerals.
For just $14.95, you may get a VIN checked from vincheckup.com, which is important for prior accident histories.
Your report will include the following:
Accident History
Lease & Taxi Use
Title Information
Hidden Damage
Liens
Junk & Salvage
Mileage Rollback
Manufacture’s Recall History
Sale Records
Lemon Check
Theft & Recovery
Owner History
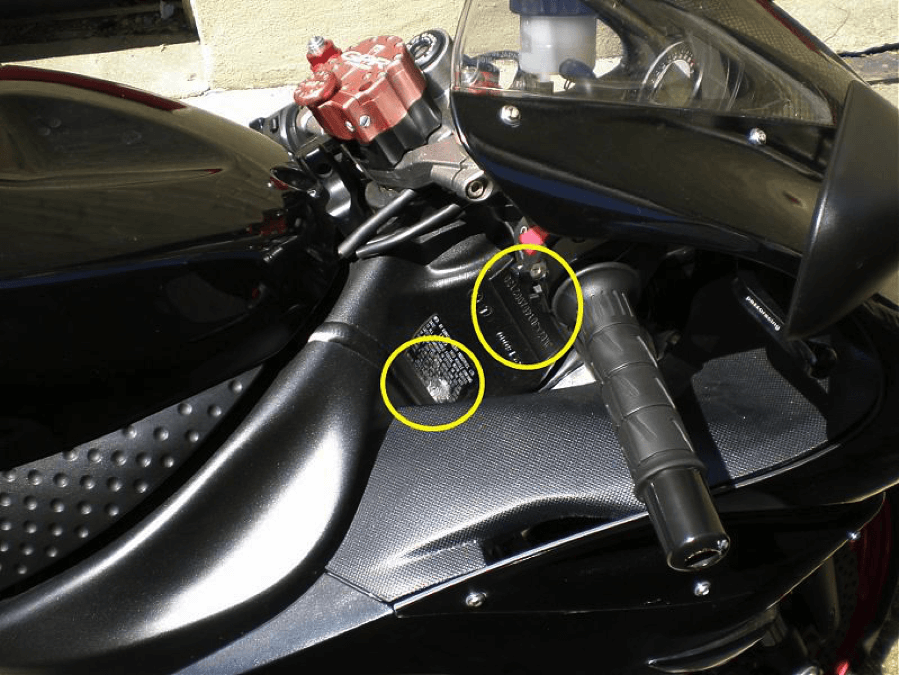
The VIN is usually located on the steering neck of motorcycles and dirt bikes, but it may also be found on the motor around the bottom of the cylinders. Turn the handlebars to the left and look at the right side of the frame where the steering head is located. The inscription is engraved vertically on the metal.
From 2015 to the present, this is the maintenance plan with corresponding service intervals for the Kawasaki Versys 650 Mk3.
The Versys 650 has seen a few major improvements during its lifetime, but the engine and basic design have remained substantially the same (though a few parts have changed).
Mk1 2007-2009: The original! A well-received bike, just thought of as a little buzzy.
Mk2 2010-2014: Updated fairing (still a stacked headlight), rubber engine mounts and foot-pegs to reduce vibration. Optional (standard in some markets) ABS and heated grips.
Parts and maintenance for the Gen 1 and Gen 2 are quite similar. You can find the Versys 650 Mk1 and the Versys 650 Mk2 maintenance schedules in their respective service manuals on sale here.
Gen 3 2015+: Re-tuned engine for 3 more kW (5 more hp), new look (twin headlights) with adjustable windscreen, updated front Showa suspension and rear KYB shock with remote pre-load adjuster, standard ABS, updated front Nissin brakes and 30mm larger rear disc
In the United States, the 2015 model is also available as an LT (“Light Touring”) variant, with hand guards and large side baggage that can fit a helmet in each case.
All variants of the Kawasaki Versys 650 have featured a fuel-injected 649cc parallel twin from its stablemate the Ninja 650 at its heart, producing a modest 50 kW (70hp) not too far up in the rpm range. It has enough power to keep you hustling at highway speeds (far into the double digits with plenty of power for passing — but you may need to downshift if you’re carrying a passenger).
The Kawasaki Versys 650 is only offered in select areas as a low-power learner-compliant model. The maintenance for these versions is same.
What you need to service the Kawasaki Versys 650
The following consumables and components are required for servicing the Kawasaki Versys 650.
Versys 650 owners are very serious home maintenance types, but if you’re lacking in basic tools, take a look at our list of maintenance items to see what more you could need. Partzilla.com has these components at a very reasonable price.
Part
Kawasaki Versys 650 Spec
Oil
You need 1.6-1.8L of SAE 10W-40 engine oil “with API SG, SH, SJ, SL or SM with JASO MA, MA1 or MA2 rating”, preferably Kawasaki 10W-40 Engine Oil.
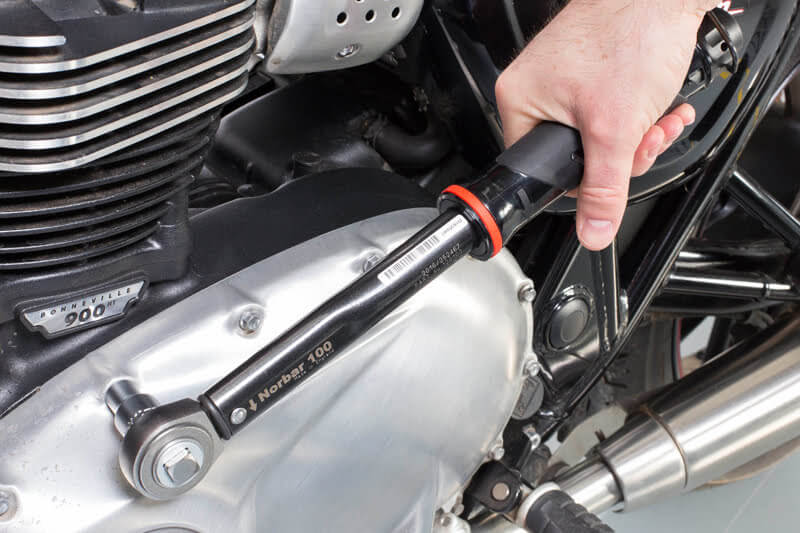
Don’t over-torque the drain bolt (spec is 30 Nm/22 lb-ft per the manual) — use a torque wrench if you don’t have experience with how much torque is enough.
Oil filter
Oil filter is part 16097-0008, or you can use Hiflofiltro HF303RC. Torque for oil filter is 17.5 Nm (12.9 ft-lb) (use a torque wrench, and it’s easier on the K&N one)
Front brake pads
Get double-sintered EBC brake pads for better bite and wear. You need FA142HH (get 2 pairs).
Rear brake pads
Get double-sintered EBC brake pads for better bite and wear. You need a different part for year 2015 only. Year 2015 (only): FA140HH Years 2016+: FA174HH
Spark plugs
NGK CR9EIA-9, with a spark plug gap of 0.8-0.9mm (use a spark plug gapping tool), torqued to 15 Nm or 11 ft-lb (use a torque wrench)
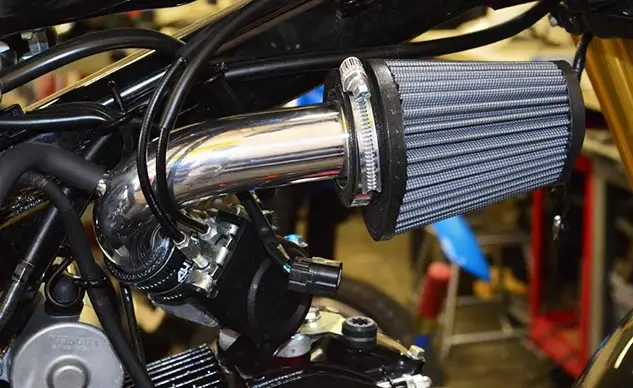
Air filter
Use the K&N drop-in equivalent. The part number is KA-6415.
Cable lubricant
Remember to lubricate your clutch cable (and brake cables if you have them) with a cable lubricant. Protect All Cable Life is a good general-purpose lubricant.
Chain lubricant
The chain needs to be lubricated every 600 km/400 miles (or more, if it gets wet/dirty). Motul chain paste is cheap and well-loved.
Brake fluid
Spec is to use DOT-4 brake fluid.
Coolant
Use nitrate-free, phosphate-free, ethylene glycol-based coolant with anti-corrosion inhibitors, e.g. Valvoline Zerex G05
Grease
Use a lithium soap-based grease for all the important greasing points.
Consumables for servicing the Kawasaki Versys 650 motorcycle
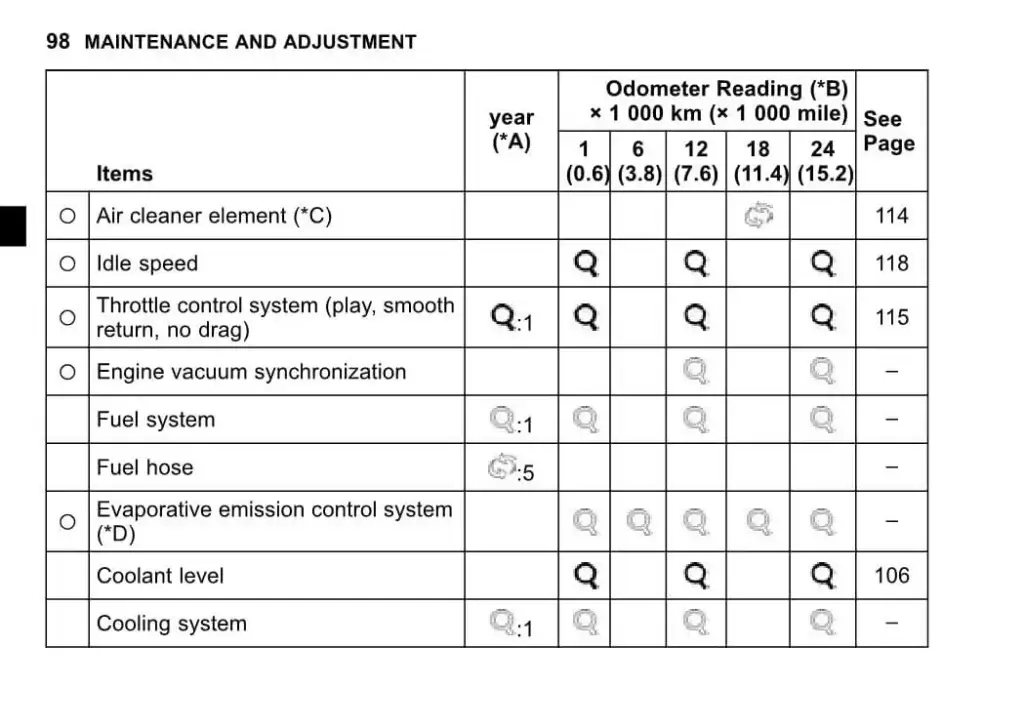
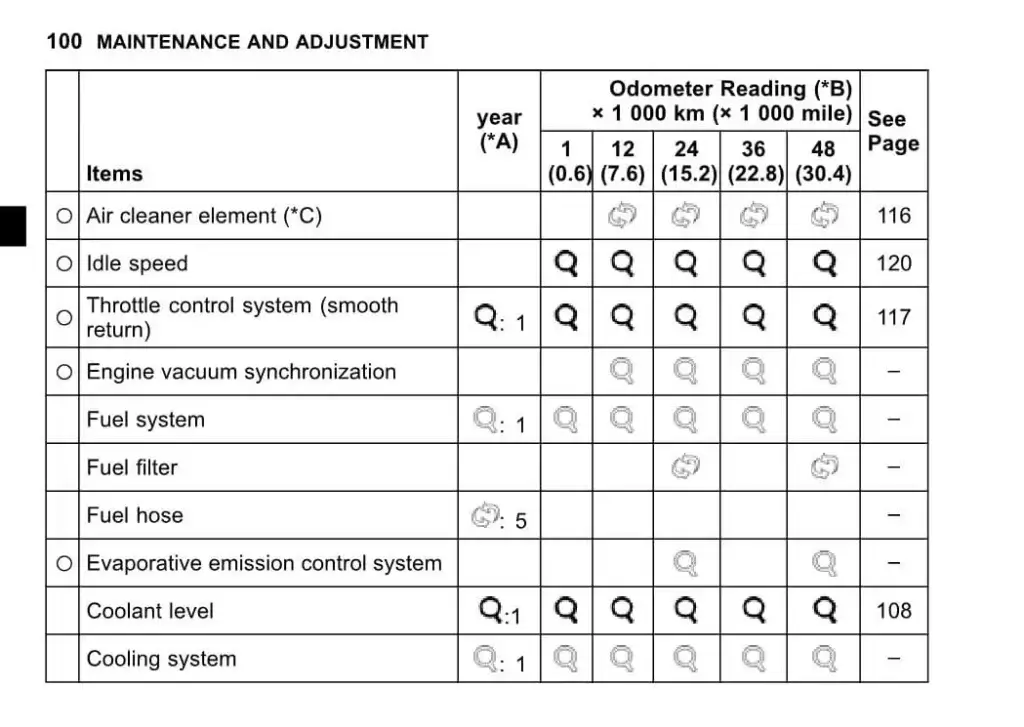
Maintenance Schedule for Kawasaki Versys 650
The maintenance plan for the Kawasaki Versys 650 from 2015 onwards is shown below. It has been simplified for exhibition purposes and to remove extraneous complexity. While the fundamental motorbike remained same from 2015 to 2018, the maintenance plan became much easier to follow beginning in 2018. That format is followed by the table below.
It has the same basic material as the previous model Versys 650, with only a few intervals modified.
The list of maintenance procedures must be performed on this motorbike is as follows, with a time or distance interval — whichever comes first.
For higher odometer readings, repeat at the frequency interval established here.
(*C) Service these items (oil, air filter, chain etc.) more frequently when operating in severe conditions: dusty, wet, muddy, high speed, or frequent starting/stopping.
km x 1000
1
12
24
36
48
mi x 1000
0.6
7.6
15.2
22.8
30.4
Air cleaner element (*C) (Part KA-6415) (Note: earlier schedules recommended every 18K km)
R
R
R
R
Idle speed
I
I
I
I
I
Throttle control system (smooth return)
I
I
I
I
I
Year, I
Engine vacuum synchronization
I
I
I
I
Fuel system
I
I
I
I
I
Year, I
Fuel filter (Note: Not mentioned in some earlier schedules)
R
R
Fuel hoses
5 years, R
Evaporative emission control system (CA only)
I
I
Coolant level
I
I
I
I
I
Cooling system
I
I
I
I
I
Year, I
Coolant, water hoses, and O-rings (Coolant: Honda Coolant, it’s high-quality)
Tyre size and tyre pressure for the Kawasaki Versys 650
The Kawasaki Versys 650 has the following tyres, tyre sizes, and pressures.
Tyre
Size
Tyre pressure
Front
120/70 ZR17 M/C (58W)
225 kPa/32psi
Rear
160/60 ZR17 M/C (69W)
250 kPa/36psi
Tyre sizes and tyre pressures for the Versys 650 (2015+)
The tyres that came with the Versys 650 in 2015 and later are Dunlop D222, however other sport-touring tyres would work just as well.
Manual for the Kawasaki Versys 650 (2015+)
The above maintenance table comes from the 2021 Kawasaki Versys 650.
It has the same essential features as the 2015 model, but the schedule has been increased to 48,000 km. Despite having the same parts, some goods require more or less service.
E.g.
The 2015 Versys 650 required the air cleaner to be changed every 18,000 km (11.4K miles). The 2021 Versys 650 recommends changing the filter more often, at 12,000 km (7.6K miles)
The 2021 Versys 650’s schedule recommends changing the fuel filter every 24,000 km. The 2015’s schedule doesn’t mention it.
In conclusion, changing the air filter more or less frequently isn’t going to hurt, but replacing the fuel filter is an excellent addition to the timetable.
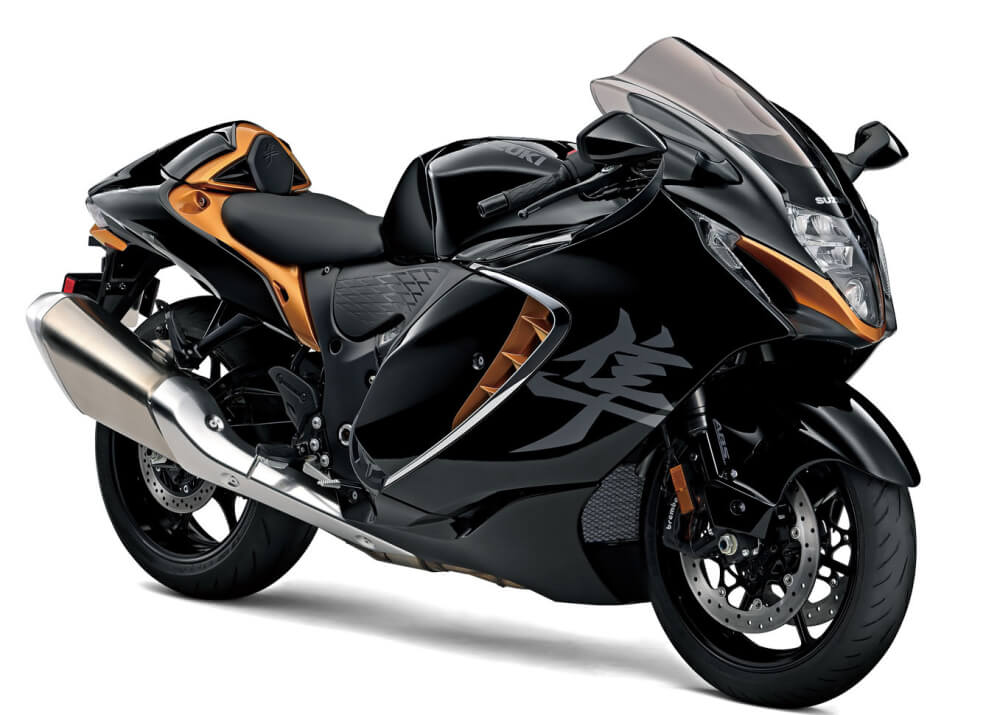
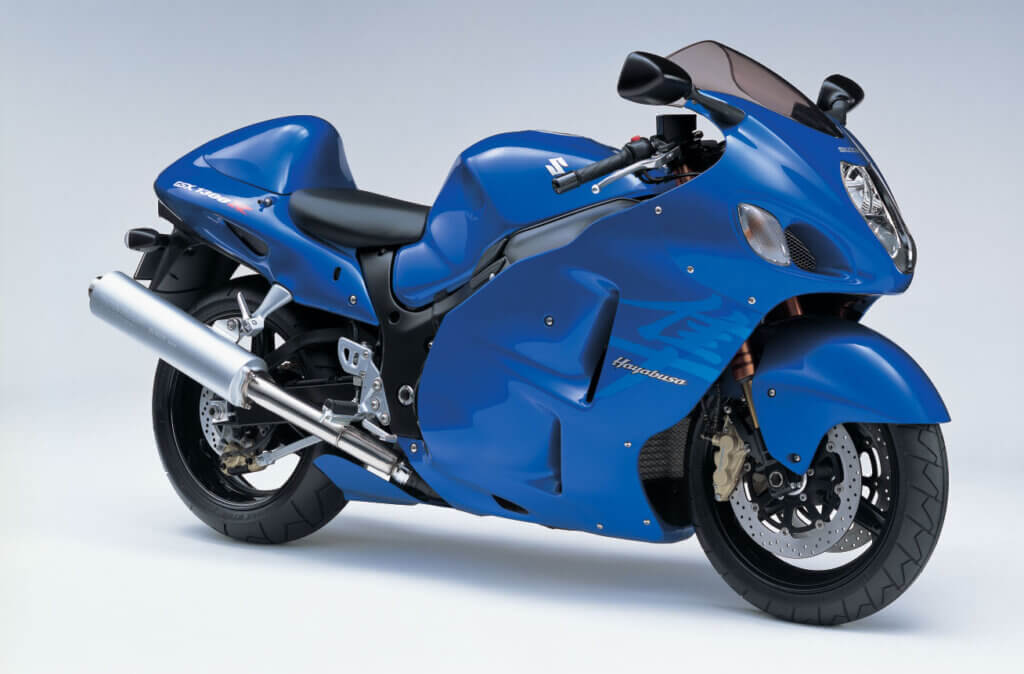
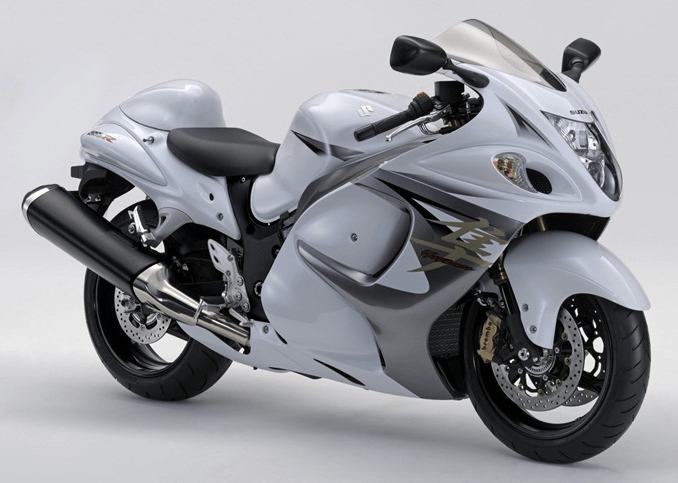
There are a few different alternatives for servicing your Suzuki Hayabusa GSX-R 1300R. Bring it to an official Suzuki workshop and pay the expensive fee, or bring it to a generic workshop and risk not knowing anything about your Hayabusa or the model, or fix it yourself.
Personally, I favor the later choice because it is the least expensive and allows me to learn more about my bike each time. However, we are not all born technicians, and a little outside assistance is always appreciated when it comes to maintenance your motorbike.
There are several manuals available, such as Haynes, Clymer, and OEM Manuals from the manufacturer.
I dislike Haynes and Clymer manuals since they are often incomplete, and I will always prefer the OEM Manufacturer workshop manual. It’s a little more complex, but if you’re serious about maintenance your bike, I highly recommend taking this course.
These manuals are now available in both hard copy and PDF format. Paper books are my least favorite since they don’t age well, become dirty, and are bad for the environment. They are also more pricey.
Suzuki Hayabusa Repair Manual PDF
In my opinion, the finest workshop manual is the OEM Workshop Manual from the manufacturer, which is available in PDF format. Each generation of the Suzuki Hayabusa will have its own model. To minimize any misunderstanding, I’ve included a link to the right handbook for each GSX-R1300R model below.
I hope you found this brief introduction to Hayabusa Repair Manual PDF (and other workshop manuals in general) useful. Please do not hesitate to contact us if you would like to see additional posts in our blog area.
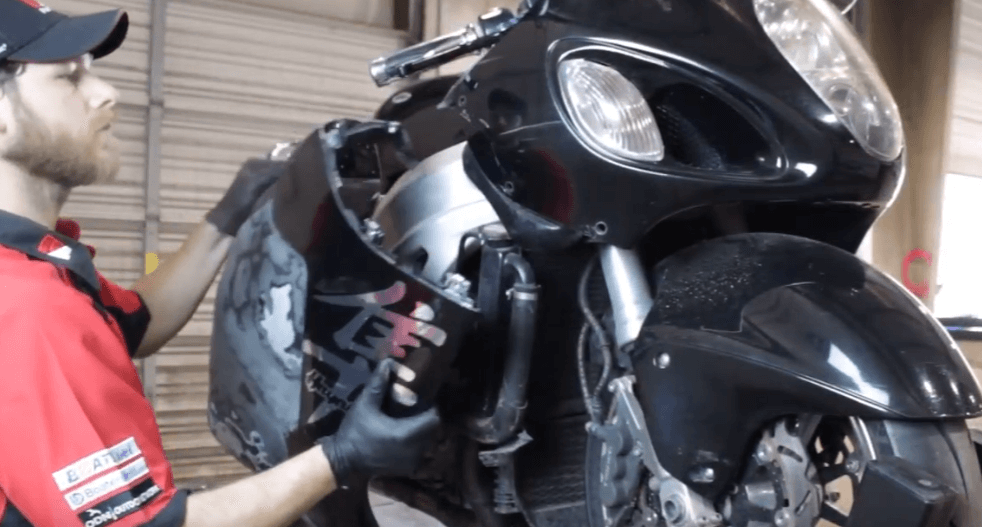
All motorcycles, including the Suzuki GSXR, require periodic maintenance to function properly and to avoid engine wear at high RPMs.
Oil changes are one of the most fundamental service routines for a motorcycle, and they are an important maintenance work that you can do fast yourself to ensure that your Suzuki motorbike runs at its peak.
To learn how to change the oil on a GSXR 1300, follow the step-by-step instructions below and watch the video at the conclusion of the article.
Tools and Parts Needed – Suzuki GSX-R 1300 Oil Change
Warm up the oil by running the engine for a minute or two. It thins it out and makes draining simpler.
Step 2.
Remove the oil fill lid to allow the engine to breathe while draining the oil, making it easier to drain the oil.
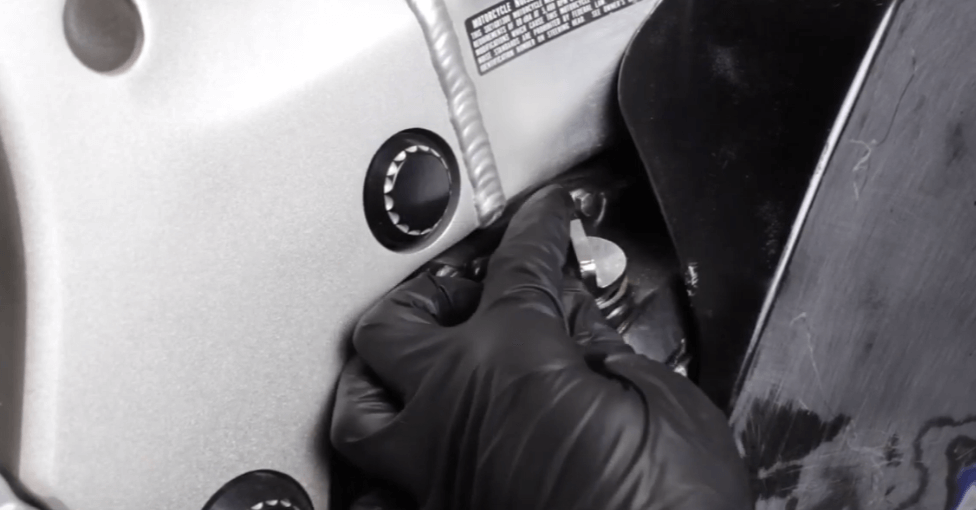
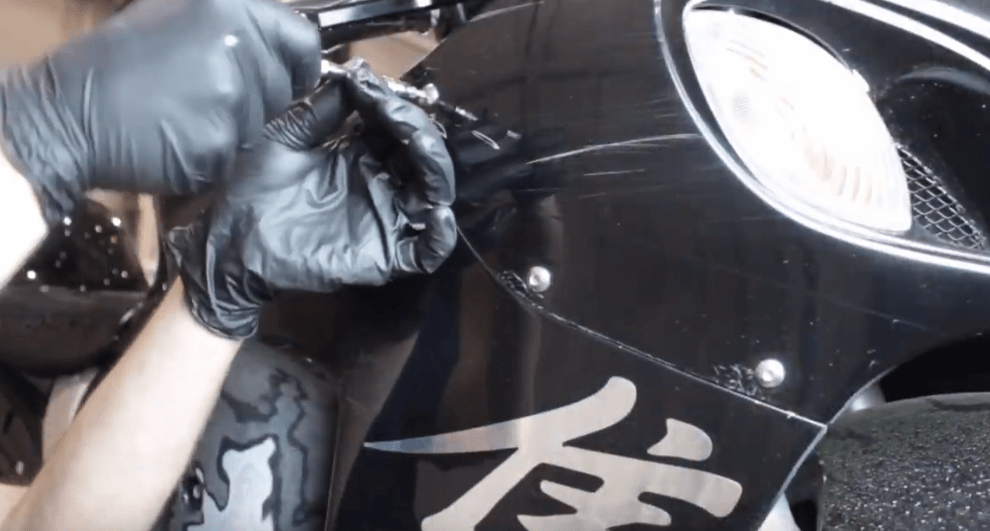
Step 3.
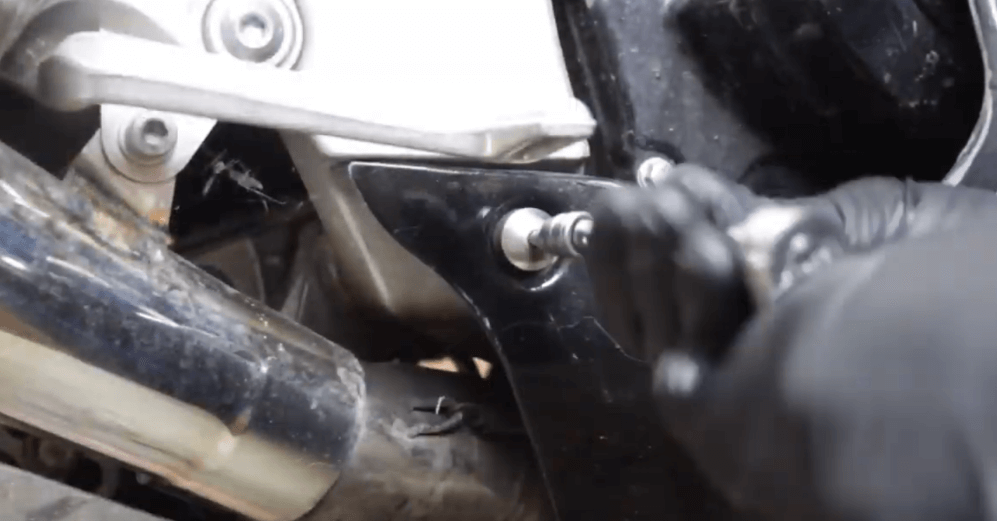
Remove the seven 4mm Allen screws and the bottom bolt holding the right side fairing in place. Then, remove the fairing to have access to the oil filter and drain bolt.
Remove the drain bolt with a 17mm socket and place a drain pan below the engine.
NOTE: Keep track of the crush washeron the bolt, and replace it if it’s damaged or missing.
Step 5.
After the oil has completed draining, replace the drain bolt and its crush washer, and twist the drain bolt to 16.5 foot-pounds.
Step 6.
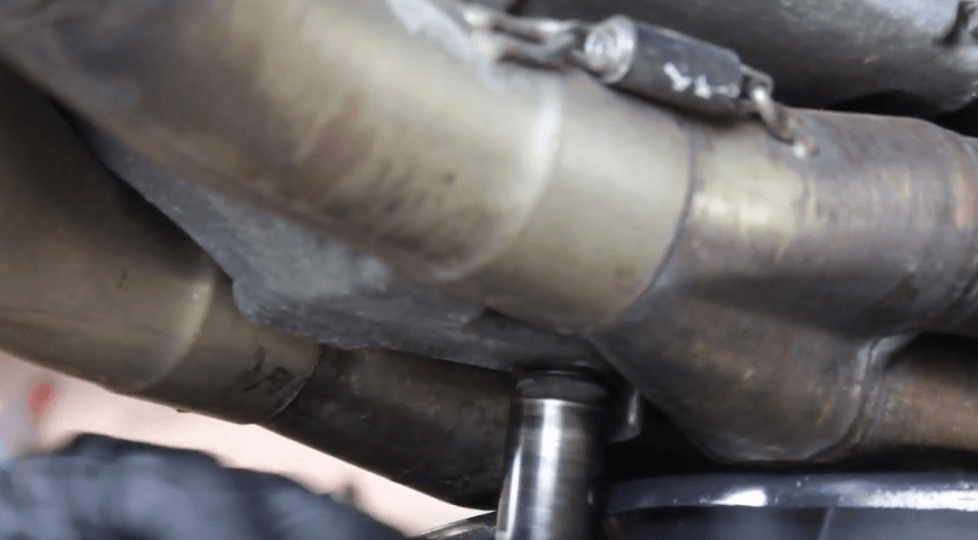
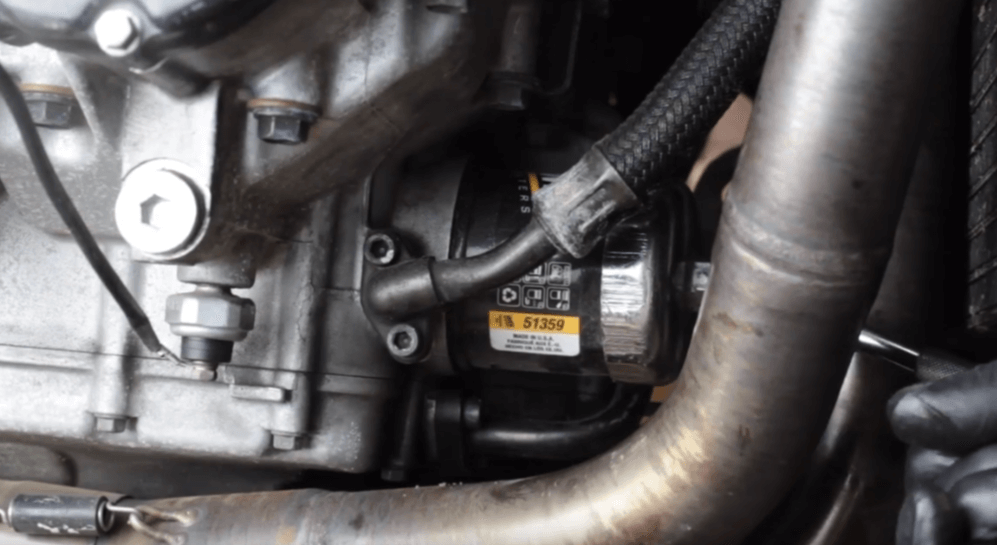
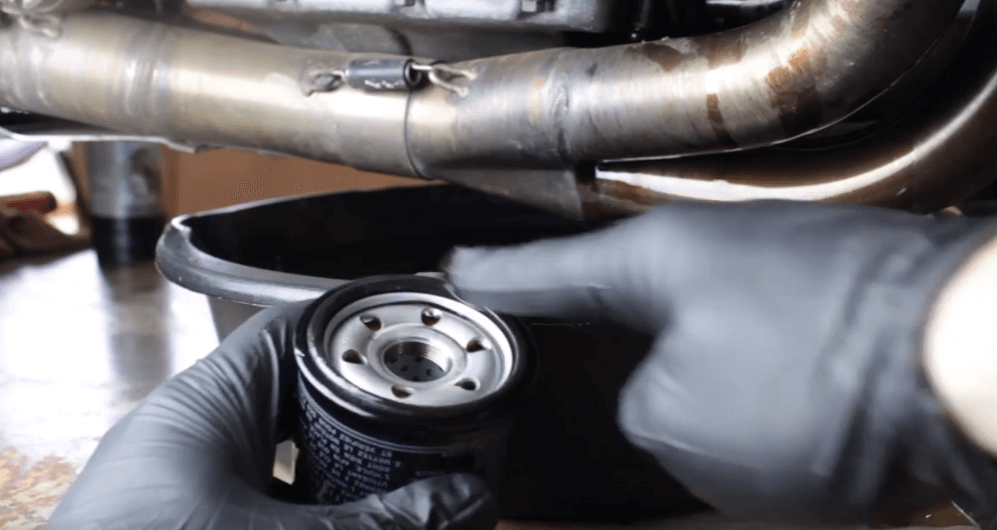
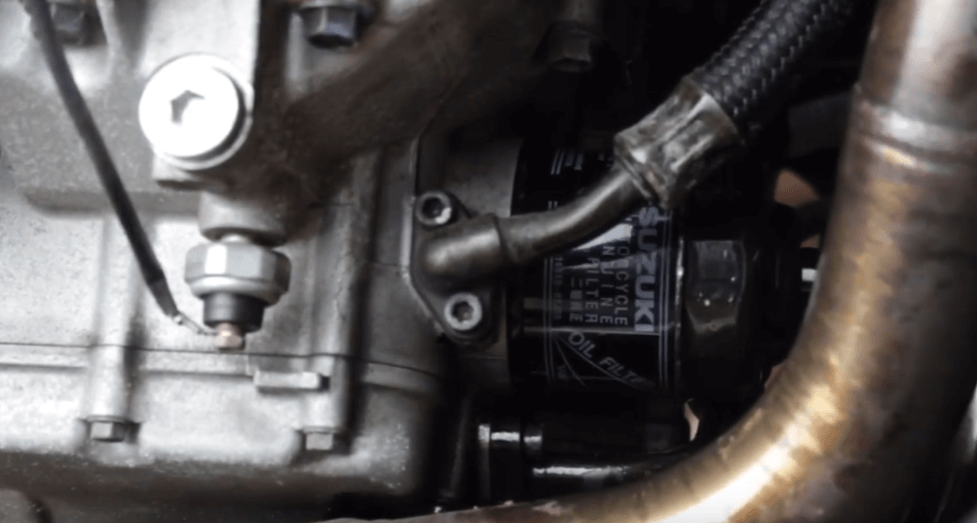
Use a 65mm oil filter wrench to remove the oil filter, which is located on the front of the engine, behind the exhaust.
Step 7.
To prepare the new oil filter for installation, rub a little oil over the gasket at the top of the filter with your finger. This makes removal easier the following time.
Step 8.
Replace the oil filter and torque it to 14.5 foot-pounds.
Step 9.
Spray a little amount of contact cleaner on the exhaust to remove any extra oil that has been spilt on it.
NOTE: If oil has leaked, do not miss this step since any excess oil on the exhaust will cause smoke.
Step 10.
Replace the fairing in the same manner that you removed it.
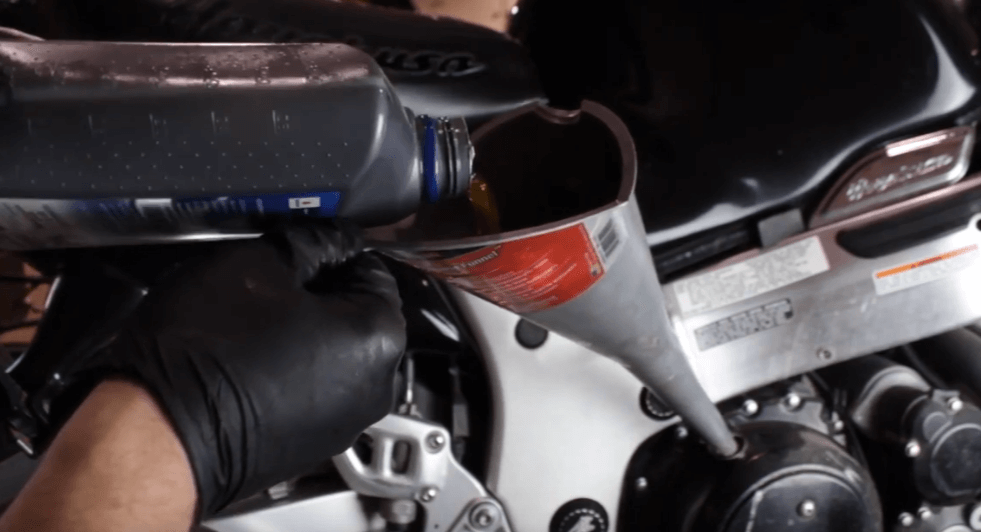
NOTE: 3.3 quarts of 10W40 motorcycle oil is recommended by Suzuki. Because automobile oil will cause your wet clutch system to slide, only use motorcycle oil.
Step 12.
Replace the fill cap, then restart the engine for a few minutes to circulate the oil. Next, turn off the engine and inspect the sight glass. finish the
NOTE: Replace the fill cap, then restart the engine for a few minutes to circulate the oil. Next, turn off the engine and inspect the sight glass. finish the
The steps for changing the oil on a Suzuki motorbike are the same or very similar.